DIY New Kitchen on a Budget
 |
| AFTER. Yum. |
 |
| BEFORE. Ugh. |
This was my kitchen before and then after our DIY renovation on a tight budget. I wanted a warm, inviting, working kitchen with most things in eye-sight and at my fingertips.
"Working kitchen" was my focus in nearly every decision. When I'm in the kitchen, I'm there to cook and enjoy that process of providing for my family. I'm not there to win a prim and proper award.
"Warm and inviting" was the second driving force. I love that my family likes to sit at the little kitchen bar-table while the coffee is perking. And I like that they hang around while supper is cooking. It's good company and makes them handy for stirring things and filling pots and such.

My husband and I built nearly every new thing in the kitchen from scratch.
Even our counter tops are made of 2x4 lumber.
This is how I turned the corner with it. Kind of like a log cabin quilt pattern.
When my kitchen redo was featured on Apartment Therapy's thekitchn.com, I caught some flak with comments like "It would have been better to just wait till you had the money for butcher block." I had been cooking in an ugly kitchen for three years "waiting to have the money". It just wasn't happening. And in those three years I had been planning and plotting and thinking how cool a 2x4 countertop would be. I like it. It's unique, it was built by us, and it has my rustic style.
It seems like most people have forgotten that it's ok, good even, to build your own things instead of buying everything factory made. This entire country was settled by people who built their own homes and furnished them with things they made from the materials available on their land.

This is what I have for kitchen drawers. Roomy wicker baskets lined with linen.
When it came to drawers I thought this would be the one thing I would buy pre-made. I was pretty intimidated by the thought of making drawers that would slide in and out easily. I knew from past experience that if they didn't glide, I would hate them.
I checked Lowes and Home Depot for a narrow cabinet section of drawers. Something plain that I could paint to match my other lower cabinets and put my 2x4 counter top on. No matter what price range I looked in, it was all particle board crap. Expensive particle board crap.
So Hubs and I built another cabinet in the same way as the others, with an extra shelf, just the right width for the space and for the baskets I bought. I have a gadget/utensil drawer, a measuring utensils drawer, and a junk drawer on the bottom.

My silverware is in the wicker picnic caddy on top and most of my cooking utensils are in a big glass pickle jar that's had the top cut off and the edges sanded smooth.

See the coffee cups, measuring cups, and metal bowls hanging above the sink?
The "cup hooks" they're hanging on are vintage silver plate silverware.

I hammered the old forks and spoons flat, bent the tines kinda funky, and curved the handles up.
Words are stamped into the spoons with my dad's old letter set. They say hot java, snickerdoodle, chocolate kisses, sugar & spice, kiss the cook, and good gravy. I drilled a hole in each piece and attached them to the black board with a plain ole screw. Drilling the holes was easy on the vintage silver plate but I've tried it on stainless steel flatware and broke a few drill bits before I called it quits.
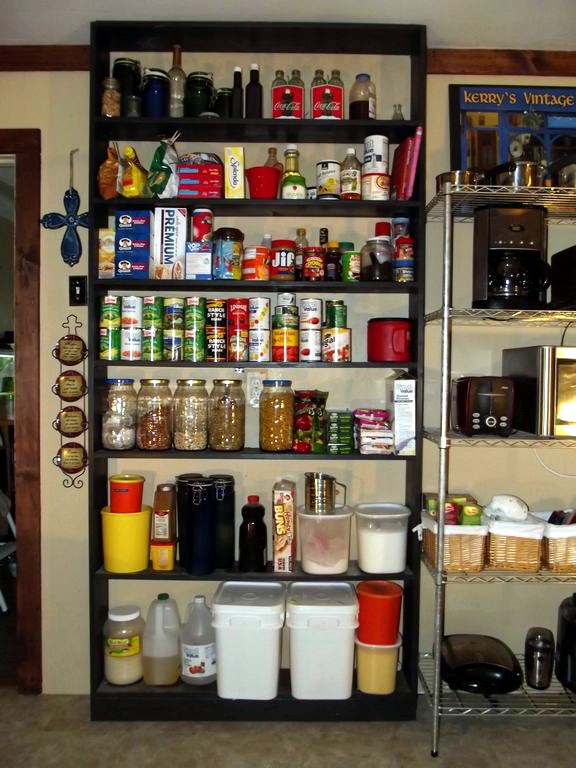
This is my open shelf, floor-to-ceiling pantry. Right there in the kitchen where it's handy.
Before we redid the kitchen, my pantry was one of those tall white, pre-fab cabinets from Lowes. I hated it. It was deep and I had to dig through and uncover things I needed every time I cooked. With this one, the canned goods are only stacked two deep and two tall. Most of the other things are a single layer of what I need.

UPDATE 2016: We wound up tearing out this wall to open the
kitchen up to the living room. New pics here.

In the before picture, at the bottom left, is the cabinet we used for the new sink section.
We painted the bottom off-black and added new brushed pewter hardware. I kept the old formica top but wanted to change the color. It was a fleshy terracotta color. We sanded it just enough to degloss it, then I coated it with the same stain I used on the 2x4's. It also got the two coats of clear gloss polyurethane that the 2x4's got. The stainless steel sink itself was given away by a couple who was also renovating their kitchen. They offered it up on our local Freecycle.
My total spent on the kitchen is under $800. I kept every little receipt every time we went to the lumber yard, the hardware store, everything. Added it all up and that's what we have.
My total spent on the kitchen is under $800. I kept every little receipt every time we went to the lumber yard, the hardware store, everything. Added it all up and that's what we have.
About the only thing left to do is put up a back splash. It seems kind of plain without one. I briefly thought about doing a copper penny back splash like this lady did. She has a good tutorial on it. But I have a feeling it would make my space darker than I want it.

What I would like is a random mix of glass tile and tumbled stone in earth tones. It would be the most expensive part of my kitchen but now that I have a kitchen I love, I don't mind waiting to save up the cash for it. Or divide the purchases up over a few months until I have everything I need.

This was one of the first inspirations for my kitchen.
I even painted my kitchen with a light breezy color. But as popular as white kitchen's are right now, I just think they're cold and lack personality. Warm and cozy is my thing. But I love open cabinet shelves and hanging cups.

Just for fun, my cobalt blue dishes are in stacks alternating with my Granny's white china.
Mom says the china was collected when Papa and Granny owned a Fina gas station (I always thought they came out of boxes of laundry detergent). She says the gas company gave a place setting of this china to everybody who bought a full tank of gas. I watch for pieces at junk antique stores but it seems like I've already got everything that was available. My sugar bowl lid got lost or broken somewhere along the way but I found a replacement on ebay last year.

Another inspiration photo.
This is a public place and I like how open it is and the rich, warm colors.
Maybe that penny back splash is what I need after all. We'll see.

I almost forgot the Don't Do The Stupid Thing I Did section: I put a work bench and shelves on the wall you don't see in these photos. I thought it would be handy for my tools and all the smaller things I like to work on. Big mistake. It is one big junky mess and is visible from the family room. I have cleaned and organized and 2 seconds later it was a big junky mess again. I should have put it in the laundry room and that's where it will go before too much longer.

The letter stamp set I used on the cup hooks. Surrounded by stuff.
That's what my entire work bench looks like.
That's what my entire work bench looks like.

I love it! My brain does not like closed cabinet doors, it's like the stuff has disappeared into an alternate universe. All my organizational areas are like this except my kitchen.
ReplyDeleteThanks Dave! One benefit I wasn't expecting is how much light gets into those bottom cabinets where I can actually see what I'm looking for.
DeleteI’m a cabinetmaker who came to this site because I was looking for ideas for a coffee caddy I want to make as part of our new kitchen. My skill level is considerably higher than yours, but I thought I would pass along a few simple tips to you. But let me preface that by saying that I like your “can-do” attitude. Truthfully, that’s how I got into this in the first place. I wanted something, didn’t have the money to buy it, and began looking for ways to make it myself. And for what it’s worth to you, I think you kitchen counter of 2x4s is just fine. You did a nice job of turning the corner, installed a countertop you can actually afford, and have the satisfaction of having done the work yourself. What’s not to like? Here are my tips:
ReplyDeleteFirst, you’re right that drawers have to fit, but you may find that Blum 230 drawer glides are not that complicated to work with. I used them the first time I made drawers. Since then I have used other drawer glides, but I keep coming back to them because they’re cheaper, easy to install, and do the job just fine.
I rarely drill into steel, but I have always gotten good results with high speed drill bits. If you were breaking them, you might want to go to cobalt. A cobalt 1/8” twist drill bit can be had for about four dollars, and surely would have done the job just fine. Always tap a hole into the work piece so the bit does not wander, and be sure to clamp it. I would have used a piece of scrap wood as a backer and drilled right through it.
Finally, you might want to look into glass tile for your backsplash. You can get whole sheets of tiny tiles that are set on a mesh to keep them together. It’s like everything else. Some cost more than others, but if you look around, you can probably come up with something that suits your budget.
Thank you for the advice Joseph. I do want to attempt drawers eventually; I'll look the brand you mentioned and give it a shot. Later, after the kitchen was mostly done, I put a small plywood table top on an old wooden rolling cart and tiled it with small glass and stone mix tiles on the mesh sheets like you're talking about. I love that table but it's a good thing it was so small because the tiles I liked best were pricey. Thank you for the great tips!
Deletethank you for the idea of the 4by 4s like you i dont have the money for store bought and i dont want cheap looking lament. my kitchen has no walls, counter , some of my cabnents i can restore but none of the bottem ones. i will be happy though to get the walls up and a counter even if it has to be held up with more 2 by 4s. my floor is hard wood which im restoring
ReplyDeleteThanks MG, I hope the post helps you in some way. If I were to do this again, I would pick a cut of wood that doesn't have rounded edges like the 2x4's. My counter tops have grooves where the 2x4's meet so crumbs, flour, sugar, etc. have to be swept out with a cleaning brush. 1x4's usually have sharp corner edges that would butt up against each other nicely. Then I'd face the front edge with a 1x2 so it would look thicker. Just a thought. I still like my 2x4 counter better than most others I see. And the price was right! Super good luck to you on your reno.
DeleteTHIS IS GREAT. I COMMEND YOU FOR TAKING CHARGE AND GOIGN FOR THIS!!!!! IM READY TO FOLLOW SUIT CANT STAND ANOTHER DAY IN AN UGLY DISFUNCTIONAL KITCHEN
ReplyDeleteThanks Bossy Thug Wife (love the name, lol)! Go for it!
DeleteThanks for sharing the useful information. It was really amazing and very informative. Keep sharing
ReplyDeleteContemporary Kitchen Cabinets
Design A Kitchen Remodel
Best Kitchen Cabinets
Bathroom Remodel
Flooring Installation
ReplyDeleteAfter I originally left a comment I seem to have clicked the -Notify me when new comments are added- checkbox and from now on whenever a comment is added I get 4 emails with the same comment. There has to be a means you are able to remove me from that service? Cheers! aol mail sign in